上篇详见:iOS XCTest实战—解决国际化开发测试痛点(上)
4. StoreKit Configuration File(无订阅需求可略过)
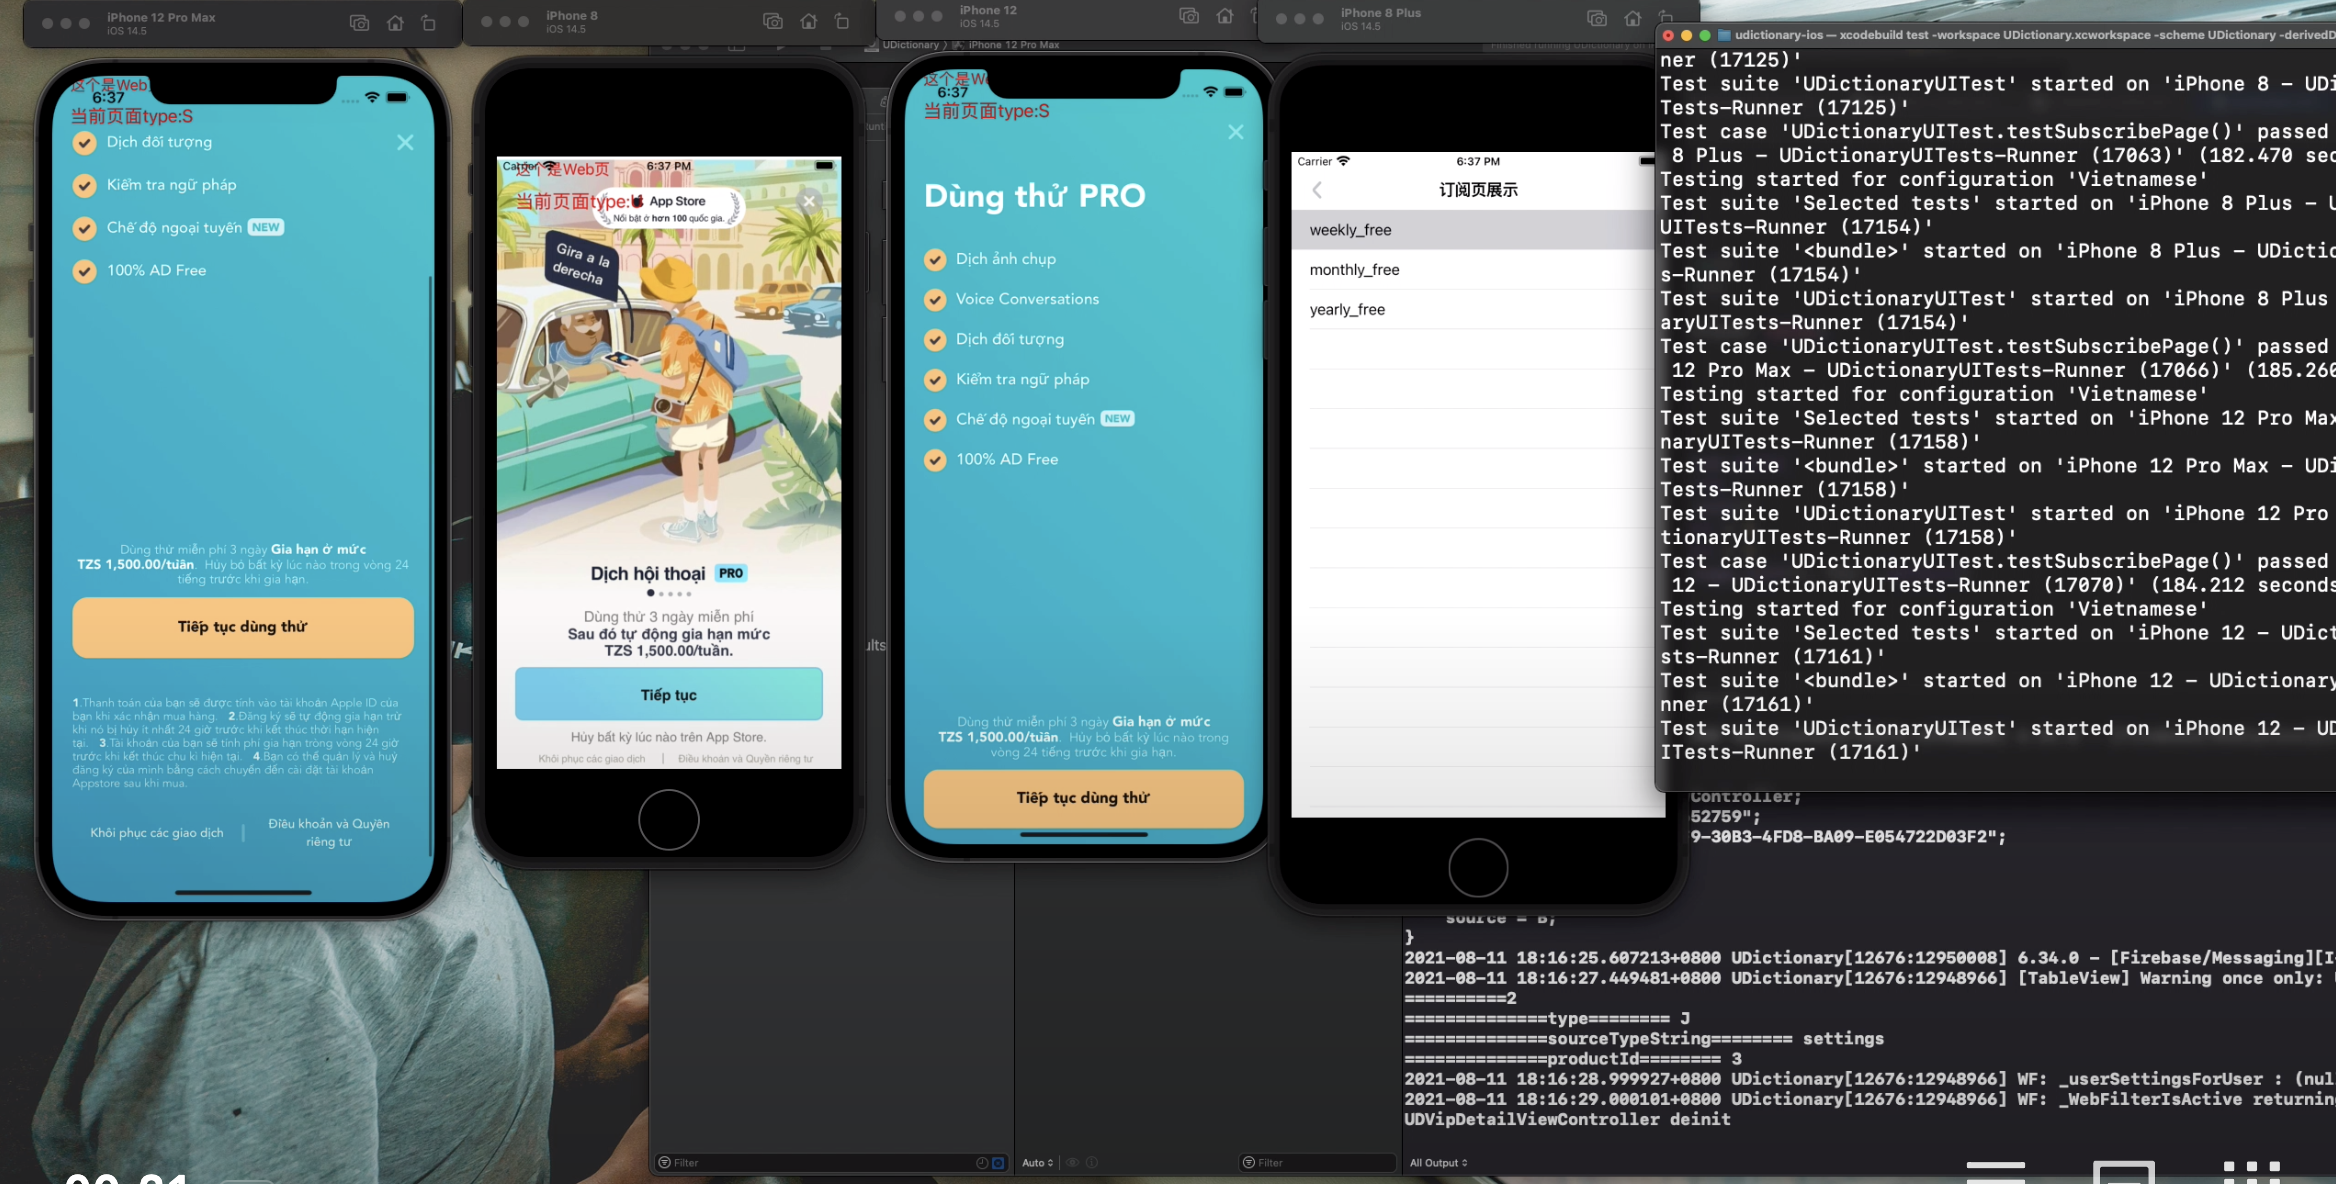
因为我们是海外订阅类App,这个测试脚本最初的目的就是为了测试订阅页以及整个购买流程,因此要对主要国家的货币和价格进行测试。
但是在Xcode12中,模拟器并不能读取线上的SKProuduct信息(Xcode13已经修复)。而真机测试也只能每次手动切换沙盒账户来切换国际和货币币种。
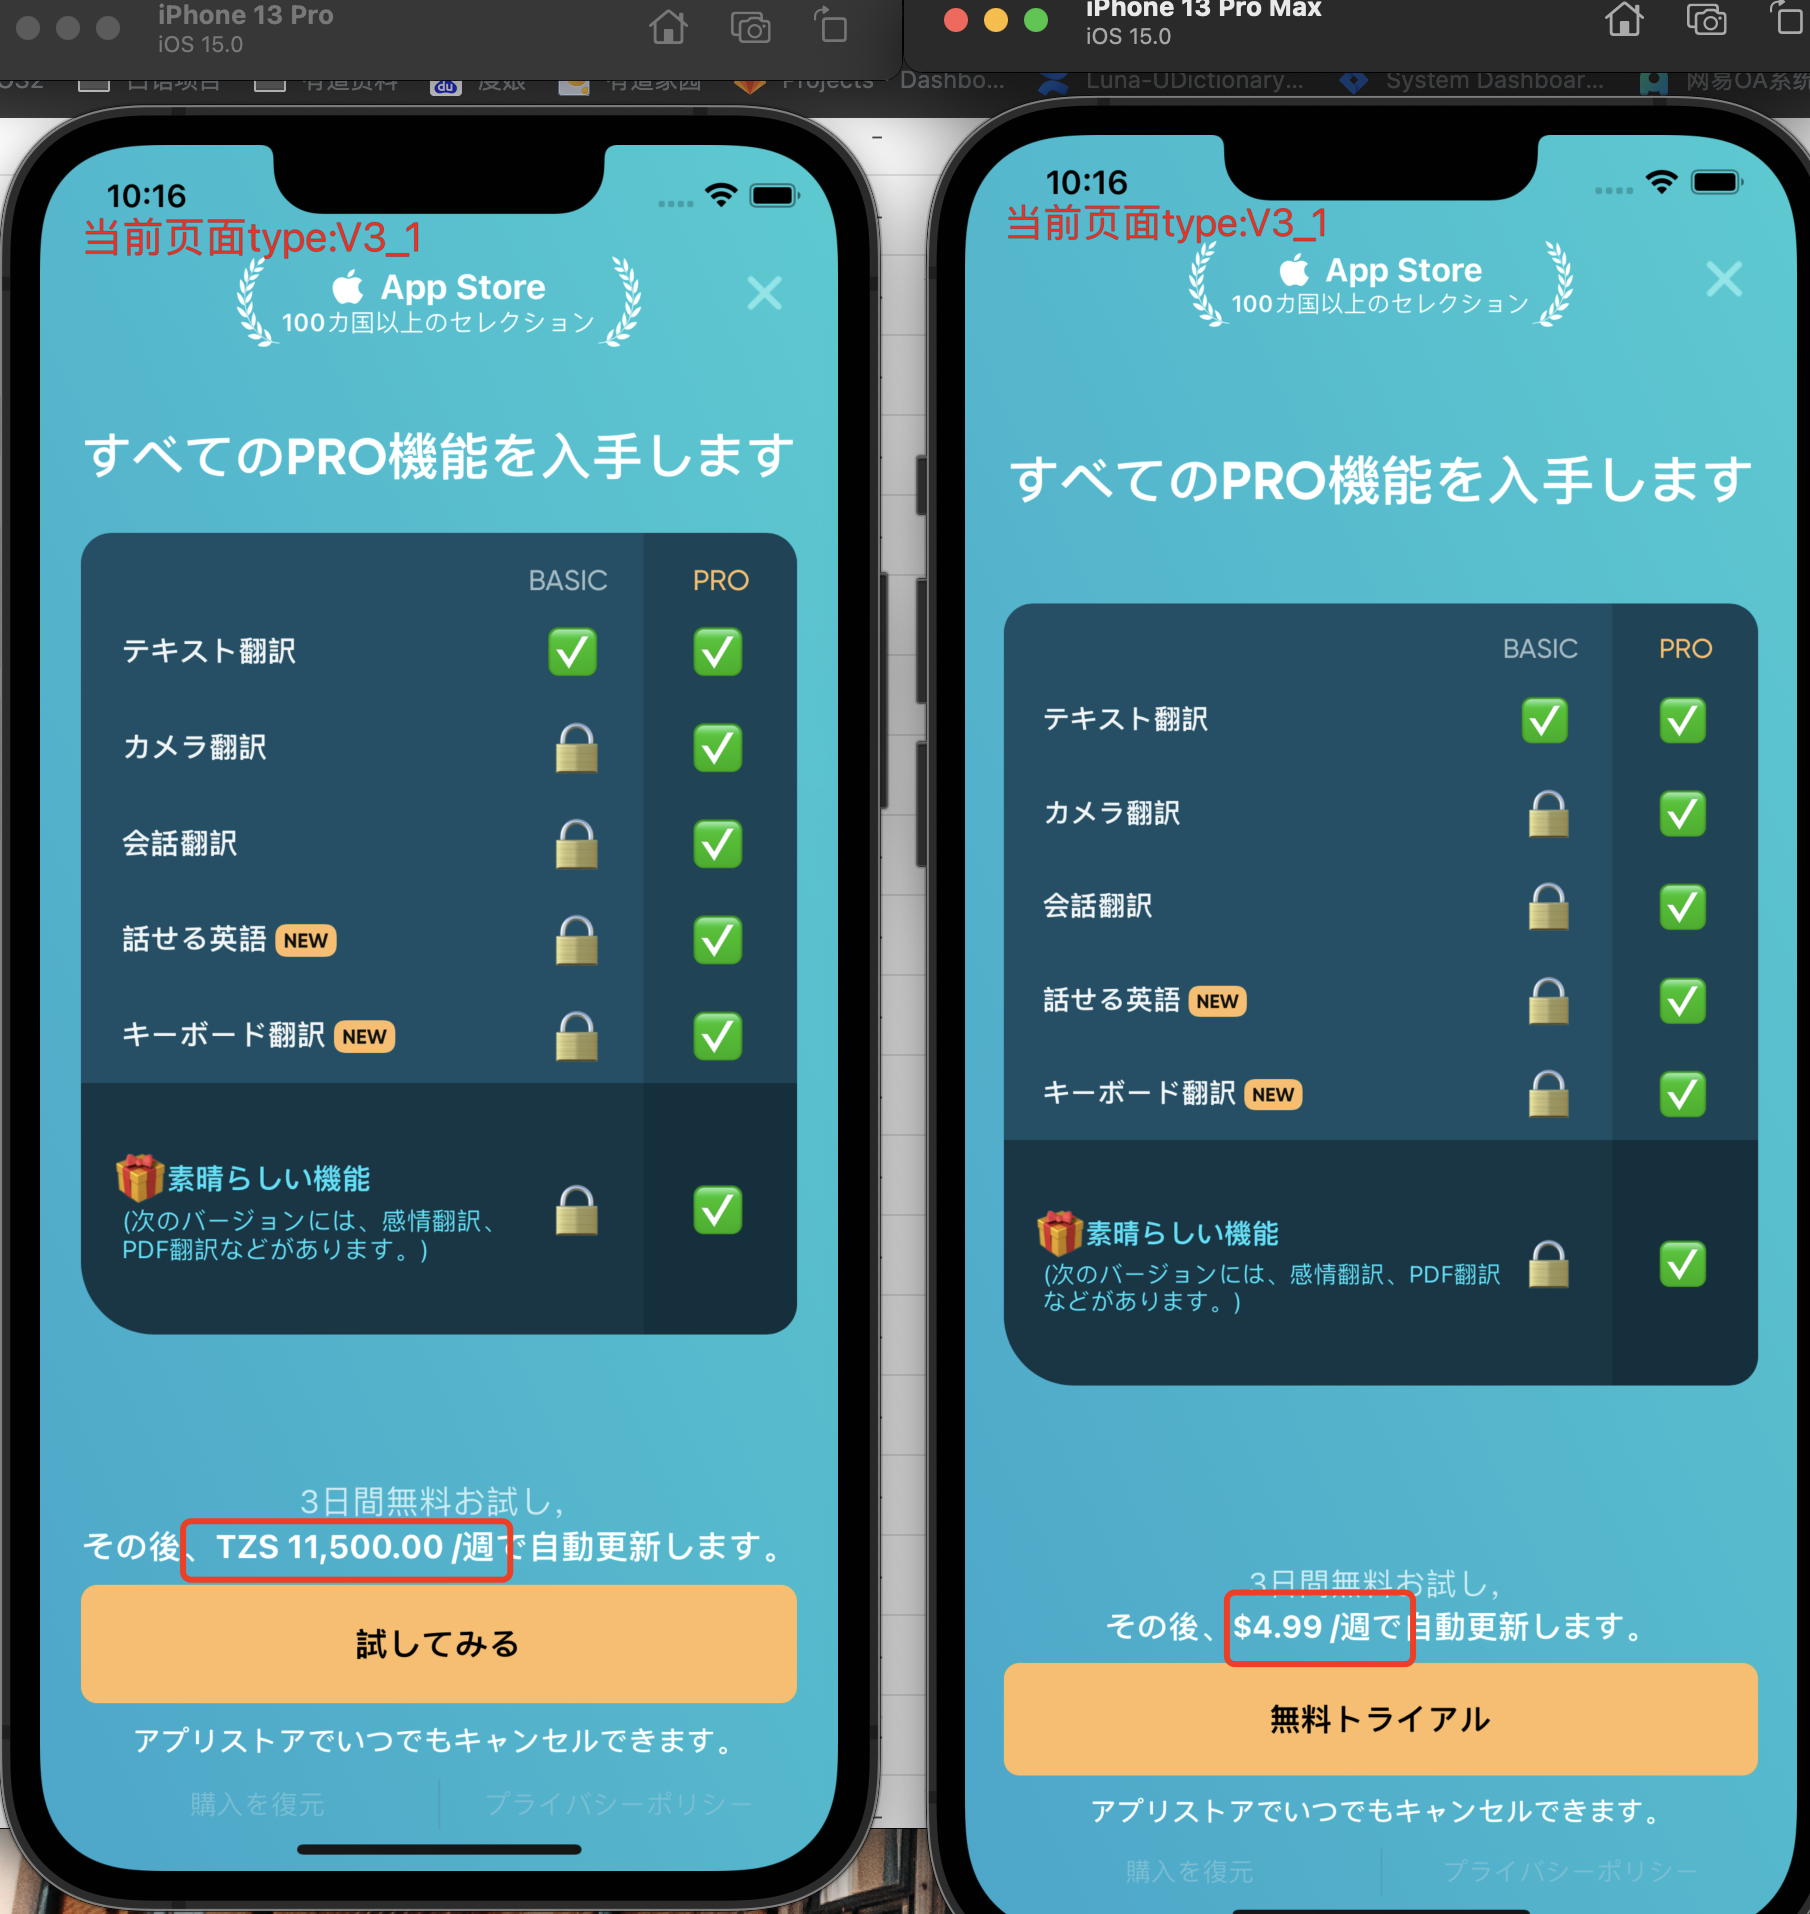
如下图所示,订阅页需要适配一些超长的货币(一般坦桑尼亚货币最长)。
通过StoreKit可以很方便的解决这个问题。
Apple 在 Xcode12 中引入了本地 StoreKit 测试,无需连接到 App Store 服务器即可测试不同的 IAP 场景。
更多信息详见:《Setting Up StoreKit Testing in Xcode》
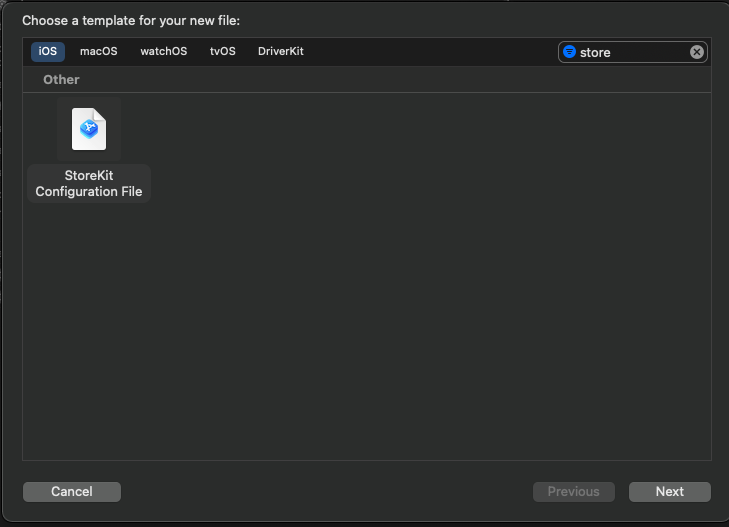
i.创建StoreKit Configuration File
创建方式很简单,在新建文件中找到StoreKit Configuration File
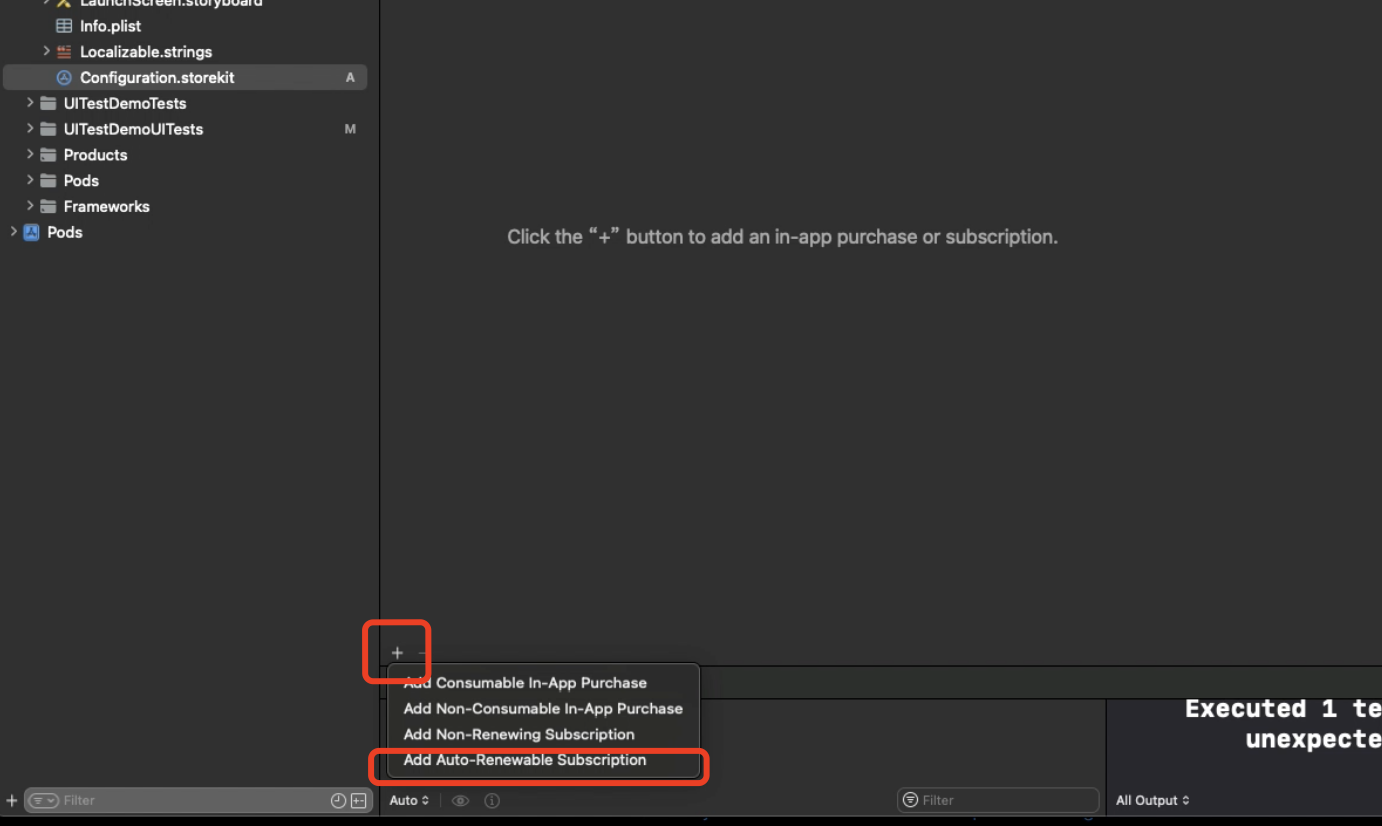
点击加号,新增一个自动续期SKU,当然也可以用来测试消耗类内购。
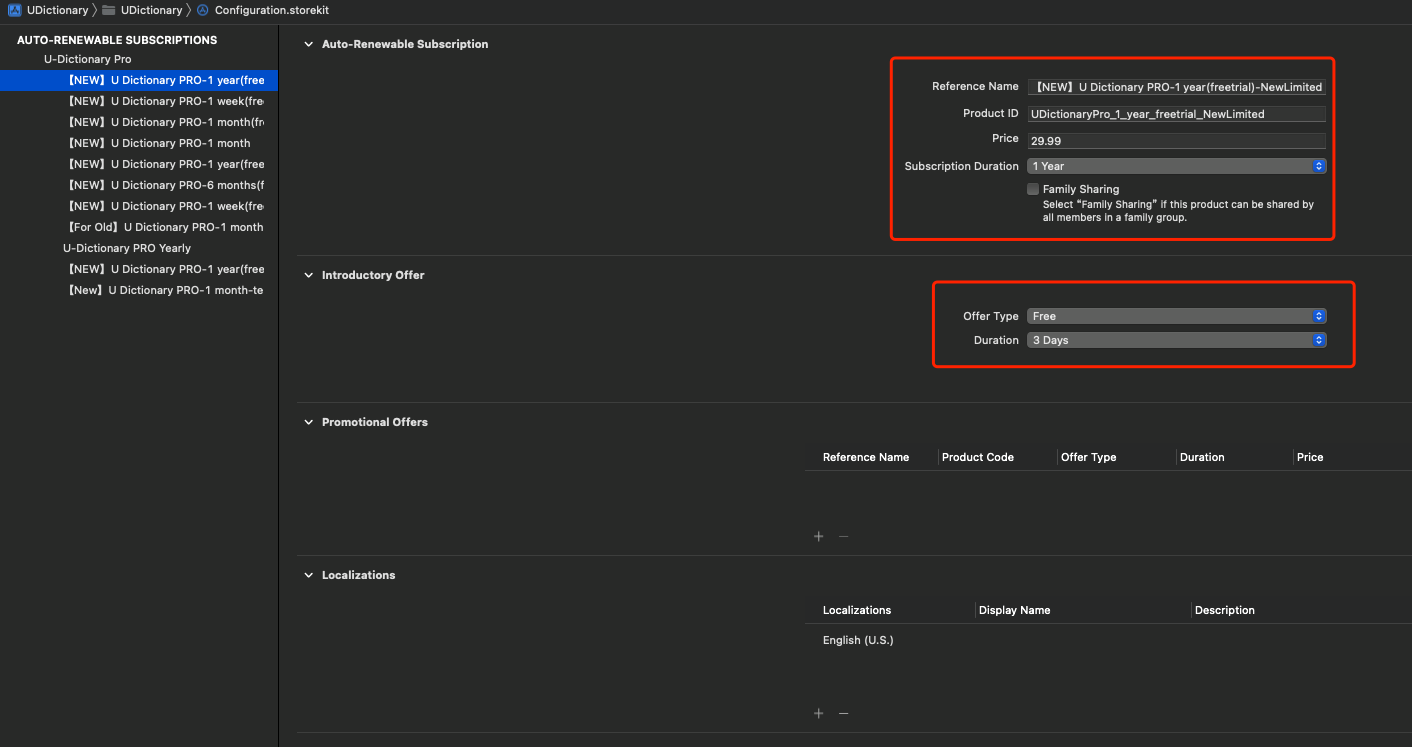
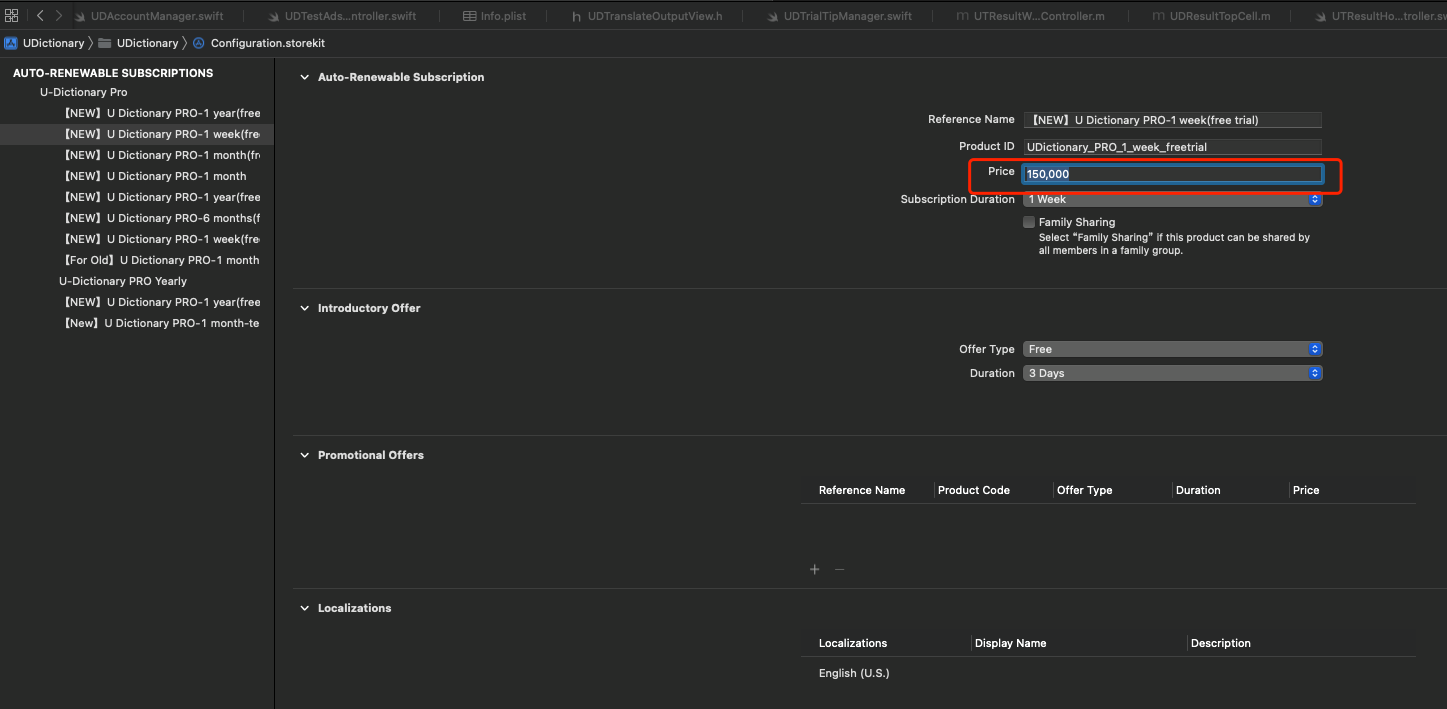
按着真实的线上SKU进行配置,还能配置推介促销优惠、促销优惠、家庭共享等功能。价格这里只需要填写金额
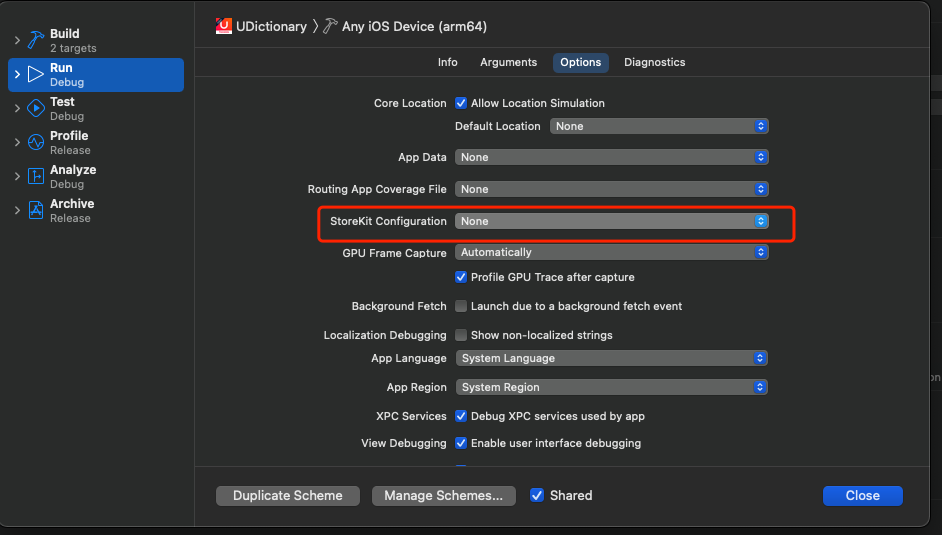
在Schemes设置中,添加刚刚配置的StoreKit Configuration
重新运行项目,就能在获取SKProductsRequestDelegate的productsRequest方法中拿到模拟的SKU了,金额默认是美元。
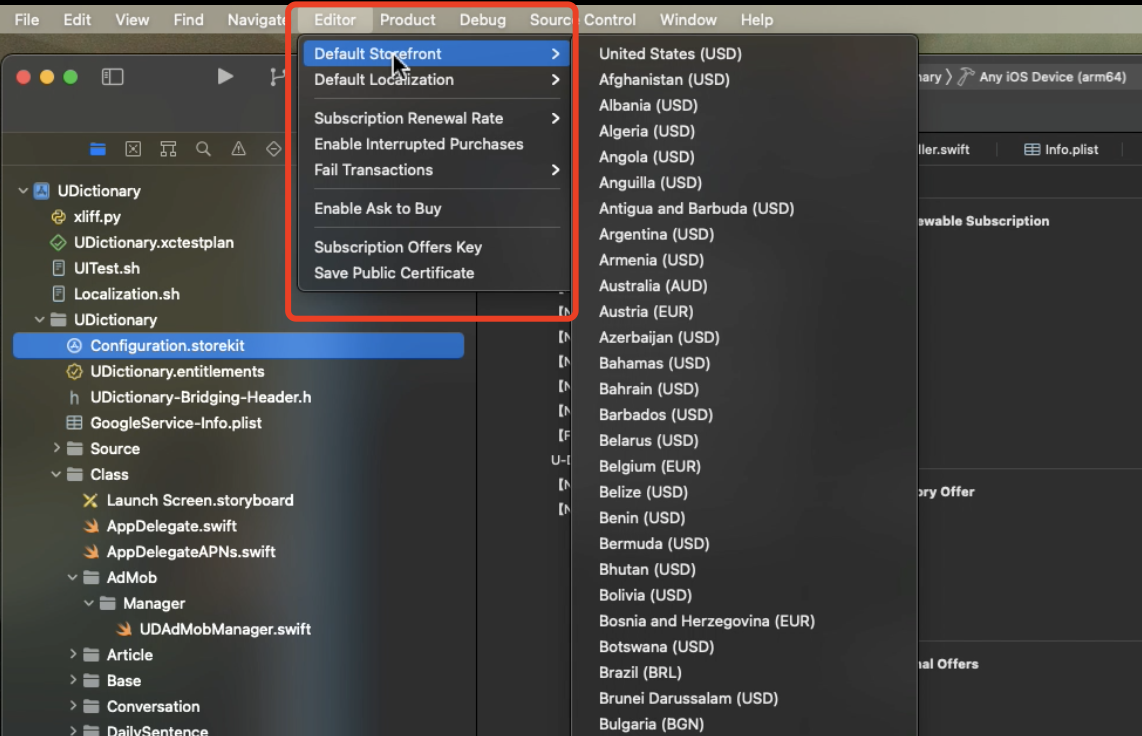
而更改货币也很方便,在项目中选中StoreKit Configuration文件,在Xcode中的Editor—>Default Storefront中进行选择相应的币种。
只需要在StoreKit Configuration中更改价格就行了,会自动读取设置的Storefront币种。
更改Storefront本质上就是更改SKProduct的priceLocale,注意最终价格的呈现方式要用系统提供的NumberFormatter来计算
let formatter = NumberFormatter.init()
formatter.formatterBehavior = NumberFormatter.Behavior.behavior10_4
formatter.numberStyle = NumberFormatter.Style.currency
formatter.locale = product.priceLocale
self.price = formatter.string(from: product.price) ?? ""
|
ii. 在XCTest中使用StoreKit Configuration File
刚刚的配置只是在Schemes的Run环境下配置了StoreKit Configuration

而在我们需要的Test环境下并没有配置入口
因此需要用代码来解决
首先找到StoreKit Configuration,把文件共享给UITests Target

然后在需要用到StoreKit Configuration的test方法中,根据新建name新建SKTestSession
更多信息请参考:《SKTestSession | Apple Developer Documentation》
注意:想要在自动化测试中使用StoreKit Configuration,需要用到SKTestSession,只有iOS14以上才支持。
func testSubscribePage() throws {
       if #available(iOS 14.0, *) {
           let session = try? SKTestSession.init(configurationFileNamed: "Configuration")
           session?.disableDialogs = true
           session?.clearTransactions()
       } else {
           ....
       }
       .....
|
5. xcodebuild
执行完上述步骤,已经可以对单个模拟器或真机执行Test Plans。如果想一次执行多个机型,就需要用到xcodebuild命令了。
熟悉Jenkins打包的同学应该对xcodebuild很熟悉,其实我们每次在Xcode进行的Run、Build、Archive等操作本质上都是执行相应的xcodebuild命令。
使用xcodebuild命令运行Test Plans命令如下
xcodebuild test -workspace UITestDemo.xcworkspace -scheme UITestDemoUITests -destination 'platform=iOS Simulator,name=iPhone 12 Pro Max,OS=14.5'
|
i. 同时运行多个模拟器和真机
一次运行多个模拟器也是可以的,还可以真机模拟器一起运行,支持不同iOS版本的模拟器同时运行。
xcodebuild test -workspace UITestDemo.xcworkspace -scheme UITestDemoUITests
-destination 'platform=iOS Simulator,name=iPhone 12 Pro Max,OS=14.5'
-destination 'platform=iOS Simulator,name=iPhone 12,OS=14.5'
 -destination 'platform=iOS Simulator,name=iPhone 8 Plus,OS=14.5'
-destination 'platform=iOS Simulator,name=iPhone 8,OS=14.5'
-destination 'platform=iOS Simulator,name=iPhone SE (2nd generation),OS=14.5'
-destination 'platform=iOS,name=caniPhone'
|
注意模拟器和真机的Name必须准确,查看所有可执行的模拟器和真机可以使用xcrun xctrace list devices

ii. 指定derivedDataPath
正常运行Test Plans,运行结果只能在Xcode中查看并且路径很深,也可以使用derivedDataPath指定结果的输出路径
xcodebuild test -workspace UITestDemo.xcworkspace -scheme UITestDemoUITests -derivedDataPath '/Users/cc/Desktop/outData'
-destination 'platform=iOS Simulator,name=iPhone 12 Pro Max,OS=14.5'
-destination 'platform=iOS Simulator,name=iPhone 12,OS=14.5'
 -destination 'platform=iOS Simulator,name=iPhone 8 Plus,OS=14.5'
-destination 'platform=iOS Simulator,name=iPhone 8,OS=14.5'
-destination 'platform=iOS Simulator,name=iPhone SE (2nd generation),OS=14.5'
-destination 'platform=iOS,name=caniPhone'
|
iii. 开启parallel
在iOS XCTest实战—解决国际化开发测试痛点(上)中Test Plans栏目介绍了为设备开启parallel testing。在xcode build中同样可以使用-parallel-testing-enabled YES -parallelize-tests-among-destinations开启(不过同时运行多个不同的模拟器,一般没有额外资源对同一个模拟器再开启parallel testing)
xcodebuild test -workspace UITestDemo.xcworkspace -scheme UITestDemoUITests -derivedDataPath '/Users/cc/Desktop/outData'
-parallel-testing-enabled YES -parallelize-tests-among-destinations
-destination 'platform=iOS Simulator,name=iPhone 12 Pro Max,OS=14.5'
-destination 'platform=iOS Simulator,name=iPhone 12,OS=14.5'
 -destination 'platform=iOS Simulator,name=iPhone 8 Plus,OS=14.5'
-destination 'platform=iOS Simulator,name=iPhone 8,OS=14.5'
-destination 'platform=iOS Simulator,name=iPhone SE (2nd generation),OS=14.5'
-destination 'platform=iOS,name=caniPhone'
|
系统会按照可用资源同时并行运行多个模拟器(一般是5个),当你指定超过5个,最开始运行结束的模拟器会自动关闭然后运行下一个。
更多的xcodebuild详见:
6. 从xcresult中提取截图
上面提到过要看Test Plans运行完后的截图,只能在Xcode中查看,并且每次只能查看一个配置,图片也只能一次查看一张。
在Xcode中找到测试结果,在Finder中显示可以看到结果是以.xcresult结尾的文件
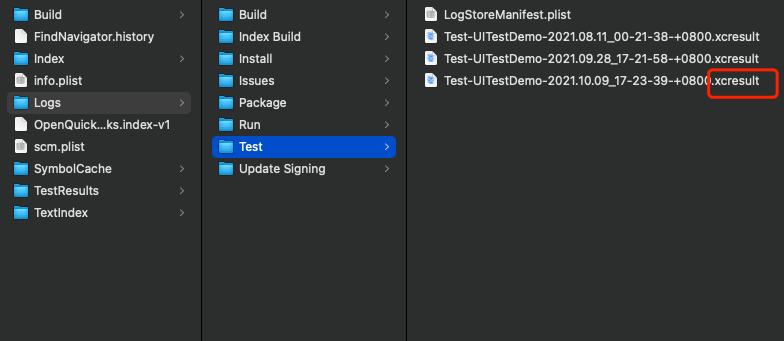
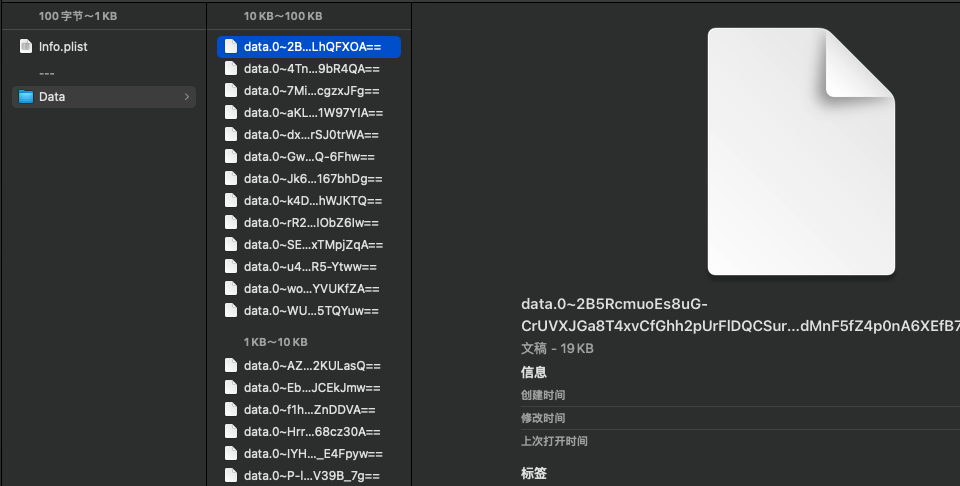
点击显示包内容后发现结果也无法读取。
通过查阅官方文档:《View and share test results》得知,可以使用xcrun xcresulttool命令来导出结果。
更多命令请查看
xcrun xcresulttool --help
man xcresulttool
|
i.xcparse
但是其实不用这么麻烦,因为在Github上有很好用的开源库:xcparse
通过brew安装后,运行xcparse命令即可
//install  xcparse
brew install chargepoint/xcparse/xcparse

//run xcparse
xcparse screenshots --os --model --test-plan-config /path/to/Test.xcresult /path/to/outputDirectory
|
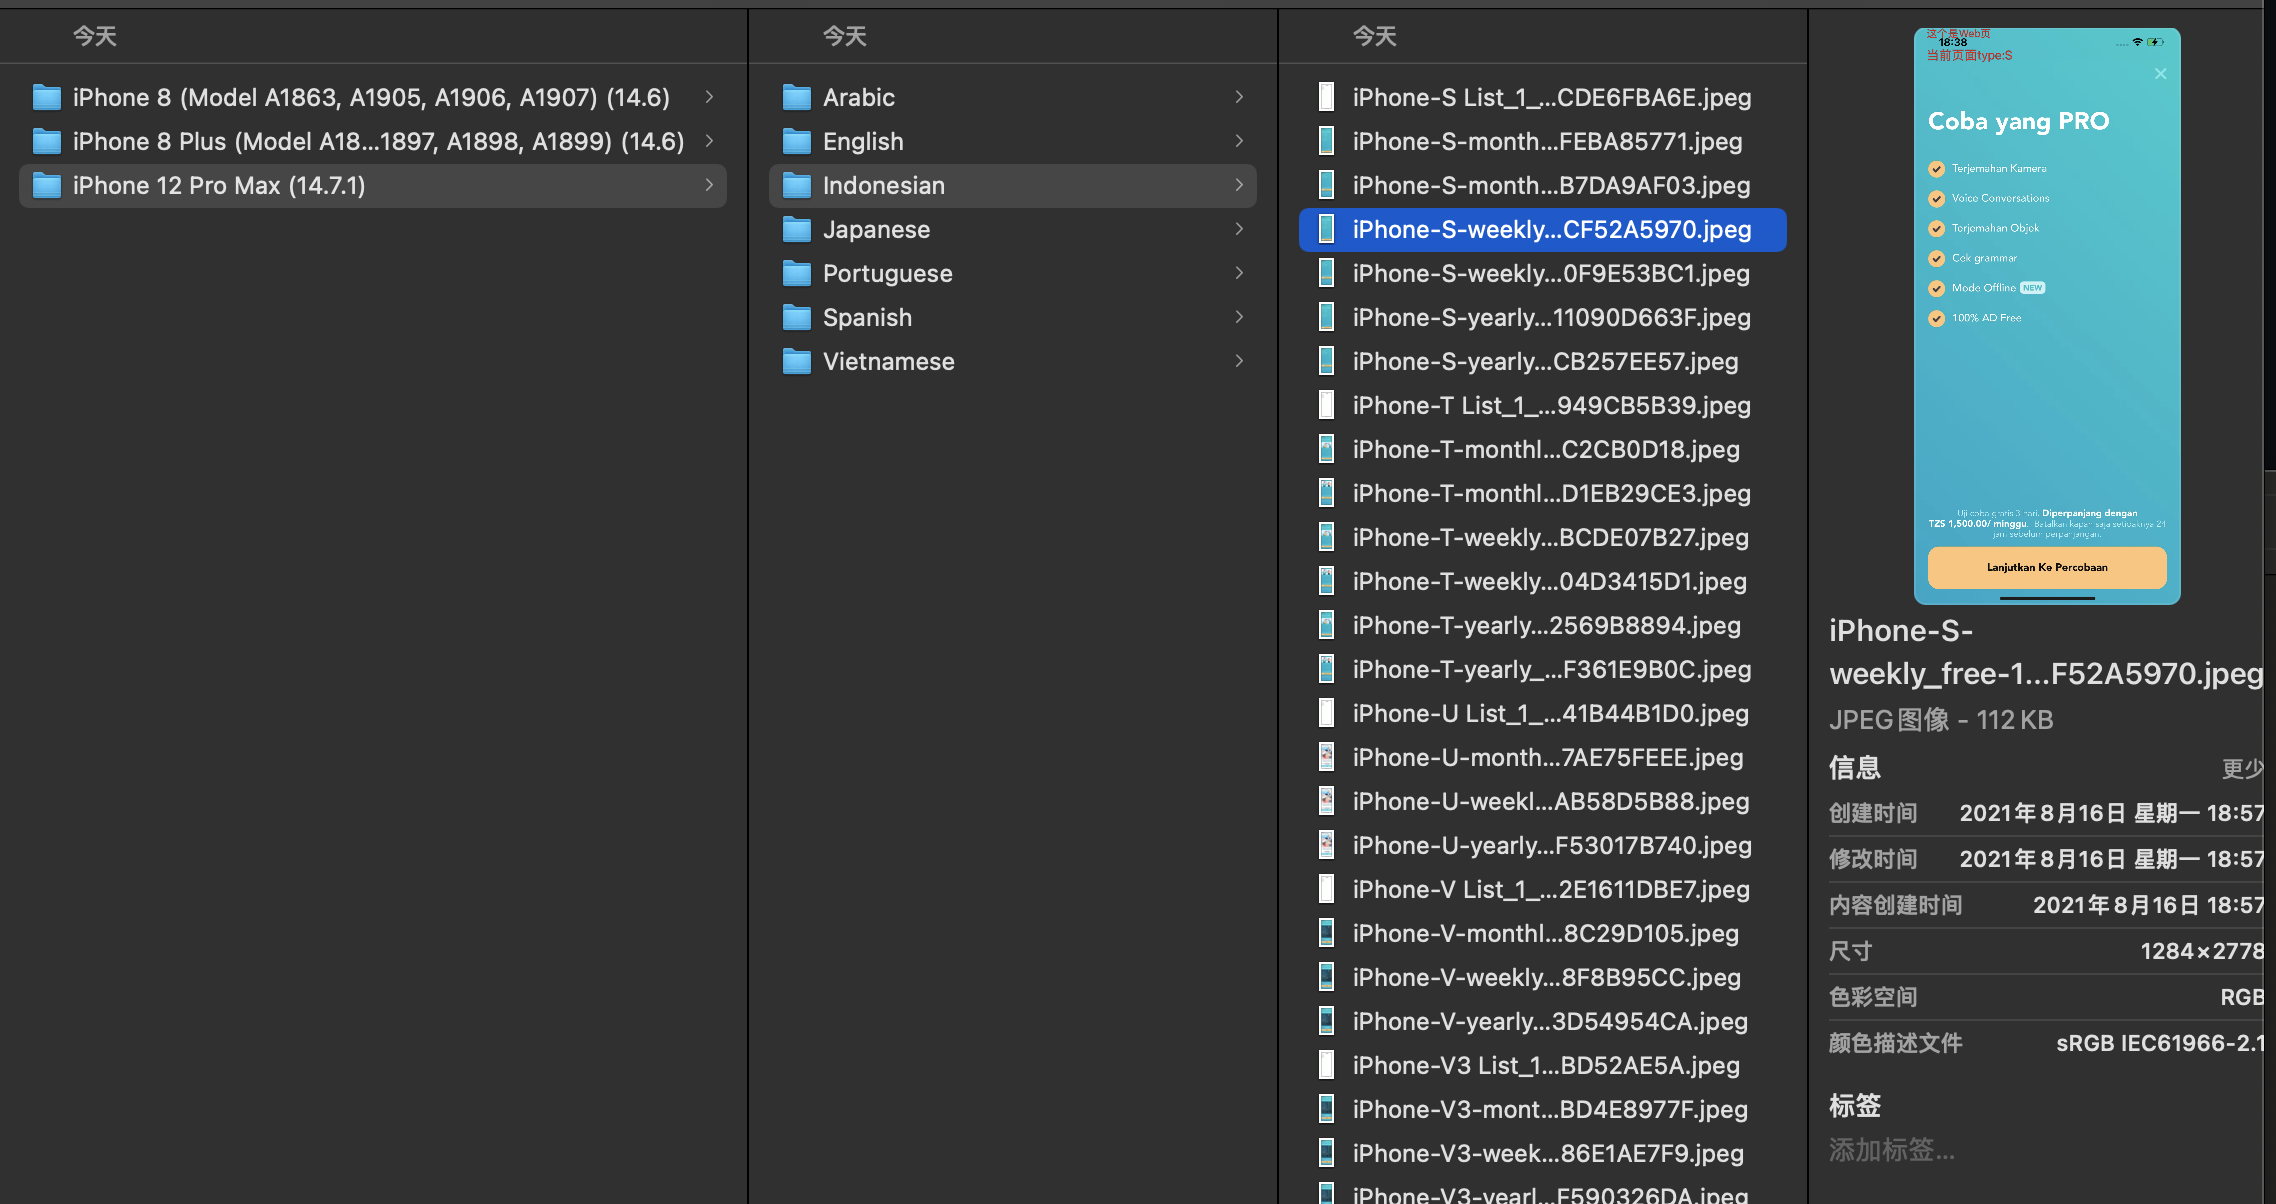
得到的结果就会按机型、语言分组展示,清晰明了。
7. 最终方案Shell脚本
做完上述所有操作,就已经基本满足需求了。但是还是差那么点意思,目前还存在以下问题:
- 每次改模拟器,都需要修改xcodebuild命令
- 输出path要手动指定,如果存在也不会覆盖会一直增加
- 运行完xcodebuild命令后,要导出图片还要手动执行xcparse命令
- 无法部署到Jenkins等让非开发人员去测试
….
所以我用了一段时间后,决定要shell脚本封装一下,做到一键操作。只需要一个命令,就可以自动执行Test Plans,拿到xcresult后自动执行xcparse命令导出到指定路径。
因为所有的难题之前已经解决了,脚本也是水到渠成。逻辑也很简单
i.脚本
代码如下:
#!/bin/sh
echo "=========开始执行========="
path=$(pwd)
echo "path is $path"
scheme="UDictionary"
outPath="$HOME/Desktop/outData"
resultPath="$HOME/Desktop/outResult"
xcUITestFunc(){
if test -e $scheme.xcodeproj
then
echo '=========Xcode Project存在'
else
echo '=========Xcode Project不存在 请检查执行路径'
exit
fi
if test -e $outPath
then
echo "=========outPath existed, clean outPath"
rm -rf $outPath
fi
mkdir $outPath
echo "=========outPath mkdir"
simulators=(
"platform=iOS Simulator,name=iPhone 12 Pro Max,OS=15.0"
"platform=iOS Simulator,name=iPhone 12,OS=15.0"
"platform=iOS Simulator,name=iPhone 8 Plus,OS=15.0"
"platform=iOS Simulator,name=iPhone 8,OS=15.0"
"platform=iOS Simulator,name=iPhone SE (2nd generation),OS=15.0"
"platform=iOS Simulator,name=iPad (9th generation),OS=15.0"
"platform=iOS Simulator,name=iPad mini (6th generation),OS=15.0"
"platform=iOS Simulator,name=iPad Air (4th generation),OS=15.0"
"platform=iOS Simulator,name=iPad Pro (9.7-inch),OS=15.0"
"platform=iOS Simulator,name=iPad Pro (11-inch) (3rd generation),OS=15.0"
"platform=iOS Simulator,name=iPad Pro (12.9-inch) (5th generation),OS=15.0"
)
destinationStr=""
for subSimulator in "${simulators[@]}"
do
tmpStr="-destination '$subSimulator' "
destinationStr=$destinationStr$tmpStr
done
echo $destinationStr
commandStr="xcodebuild test -workspace $scheme.xcworkspace -scheme $scheme -derivedDataPath '$outPath' $destinationStr"
echo $commandStr
eval $commandStr
echo "=========XCTestPlan执行结束========="
echo "----------------------------------"
echo "----------------------------------"
}
getAllScreenShots(){
if test -e $resultPath
then
echo "=========resultPath existed, clean resultPath"
rm -rf $resultPath
fi
xcresultpath=$(find $outPath/Logs/Test -name "*.xcresult")
echo "=========即将输出图片到$resultPath"
commandStr="xcparse screenshots --os --model --test-plan-config $xcresultpath $resultPath"
echo $commandStr
eval $commandStr
echo "=========xcparse执行结束========="
}
xcUITestFunc
getAllScreenShots
|
ii.运行脚本
运行方式也很简单,在Terminal中找到工程目录,执行Shell脚本,比如我们Shell脚本为UITest.sh
chmod +x UITest.sh
./UITest.sh
|
8.结语
至此,UI自动走查方案已经全部完成了。有了这个脚本后,我们工程每个版本开发自测和测试平均节省了5/人/天的工作量。特别是后来我们开启了iPad适配后。而UI走查也能看到最终结果的真实呈现。目前已经稳定运行了4个多月,后续还会根据需求继续优化。
本方案设计到很多技术点,比如XCTest、Test Plans、xcodebuild、StoreKit Configuration等等,每一部分单独拎出来说都可以单独写一篇。
所以本文很多地方都一笔带过,主要讲方案的选择和融合。如果哪方面有疑问欢迎大家联系我进行讨论和交流。
联系方式:
李伟灿
网易有道 国际App
Github
liweican#corp.netease.com
liweican1992#163.com
感谢您的阅读~